Updated July 18th, 2019
Tor is a network that uses peer-to-peer connections. These connections from one person to another are very strongly encrypted, not only allowing people to securely go to websites without leaving a trace of who they are, but they allow people to encrypt everyday internet connections. Today, I will be focusing the main part of today’s tutorial on connecting to IRC networks via Tor (if u want to use tor as a socks proxy for everything then follow our here). Keep in mind, I will be explaining this from complete start to end as if you are just learning about what Tor is.
The first thing you are going to need is obviously the latest version of Tor from the Tor website. It’s going to download an exe file for you to open and extract. Go ahead, and extract the files to a place where you are going to have easy access to it. I personally extract all the files to a folder on my Desktop so I can get to it at any time. To make things easier for you just follow our easy tor installation tutorial.
Now that you have Tor ready to go, you will see four folders and one file called “Start Tor Browser.exe”. All you have to do to get Tor started is run the “Start Tor Browser.exe”. Now that all the menus have been taken care of, your life will be much simpler, since it is the last time you will have to deal with it. After all of those menus are closed, you will be greeted with a nice webpage that says you are configured to use Tor and that you are ready to go! Feel free to click the “Test Tor Network Settings” button for a double check. That step is optional, but you absolutely should go up to the little “S” with an exclamation point on it, click it, and check the “Forbid Scripts Globally” button. This will protect you from accidently leaking important information while browsing the internet.
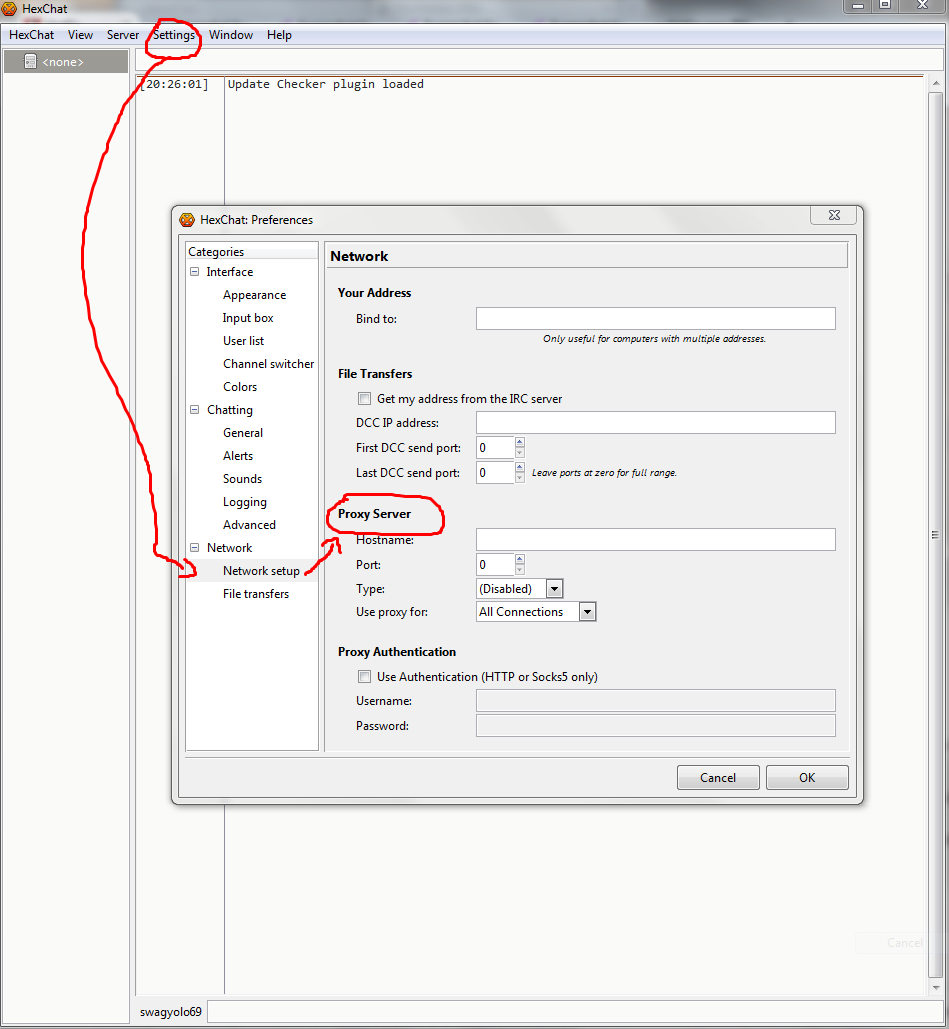
Alright. Your Tor browser is now up and running. For the next steps, you must keep the Tor Browser open. If it is closed at any time, the connection will close. For this example, I will be using the HexChat IRC client. Finding an IRC server will be up to you, but a simple search on a directory website will surely get you some results. So firs you will need to open up HexChat or your favorite IRC client and get to the settings and/or preferences area. From that menu, you will need to get to the “Networking” and/or “Proxy” section.

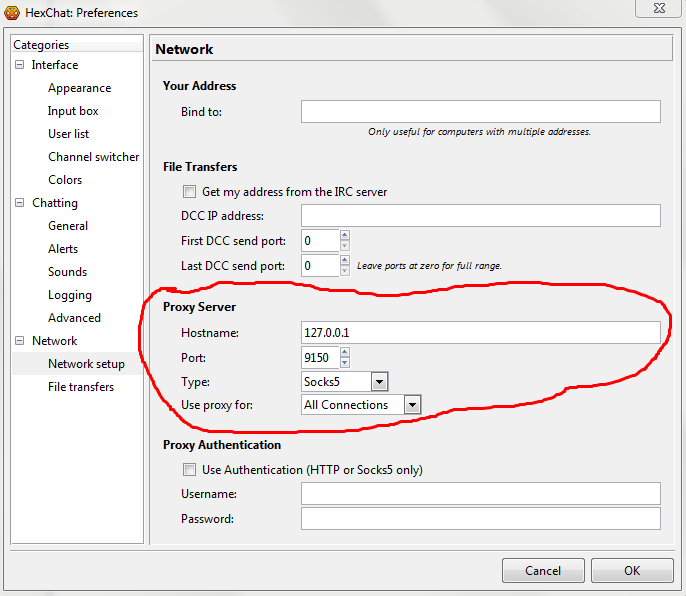
From this menu, you will need to enter the proxy settings for the connection. Using this example, the “Hostname” will need to be “127.0.0.1” or “localhost”. Either one will work. The “Port” will need to be set to “9150”. The “Type” will be set to “Socks5”. And finally, “Use proxy for” will be need to be set to “All Connections”. Breaking this down, the IRC client connects via the Socks5 proxy at 127.0.0.1 on port 9150 to the IRC server over all the IRC connections so all the connections will be encrypted. After all this is entered, just hit the “OK” button.

After this, all you need to do is add a server to connect to, select your usernames, if you wish to use SSL, and other personal settings which will depend on your personal preferences. And that is it! You are now connected to an IRC server via Tor with the full encryption benefits of Tor! And this isn’t just used for IRC. This can be used on pretty much anything that allows a proxy connection such as Firefox, Chrome, Pidgin, FTP connections, PuTTY, and much more!


“mirc is by far, the most used IRC client.”
That doesn’t mean it’s the best though does it?
“Your article should be revised to reflect this as your instructions are incomplete when using mirc.”
Fuck mirc and fuck proprietary software. Fuck Windows while we’re at it.
mirc is by far, the most used IRC client.
Your article should be revised to reflect this as your instructions are incomplete when using mirc.