


Updated July 18th, 2019
To wrap up the last of the PGP guides we’ll be covering gpg4usb. Gpg4usb is a PGP tool that can be ran off of a USB drive and works on both Windows and GNU/Linux, with OS X support planned. It features a very intuitive user interface, portability so it can be used on multiple devices, and is of course open source. It uses GnuPG as the backend, like most PGP methods. The operating system used in this tutorial will be Linux Mint, but the UI will be the same across GNU/Linux distros and Windows versions.
Please keep in mind that not all versions of PGP are created equally, some PGP programs use an insecure or unsafe version of PGP that could comprimise the encrypted message. Others — namely PGP4Win, Kleopatra, and GPA – use depreciated versions of GnuPG. This means that they aren’t up to date with the latest version of GnuPG or meet modern PGP standards. This can be dagerous as, for example, Kleopatra doesn’t generate subkeys. Subkeys are important as they can be revoked to minimize damage from a comprimised key. You’ll also want to keep in mind not to use online PGP methods like iGolder. You don’t own the keys, so you can’t be 100% sure they aren’t encrypting/decrypting messages that are meant for your eyes only.
Why use gpg4usb over other PGP methods?
- gpg4usb creates RSA keys with an encryption subkey and a master key. Your master key is used for signing other keys, creating subkeys, and revoking subkeys. Having subkeys is very important since if it becomes compromised, you can revoke it with the master key and create a new secure subkey.
- Like stated above, gpg4usb is cross-platform. If you decide to switch from Windows to GNU/Linux you can still have the same keys and a familiar interface to work with. With OS X support planned this only gives another reason why you should use gpg4usb over other programs.
- gpg4usb is portable. This means that you can bring your keys and PGP program with you wherever you go without needing to import your keys into another program. If you plan on doing this though it’s a good idea to encrypt you USB drive.
- The interface for gpg4usb is the most intuitive out of all other PGP front-ends. The UI is laid out in an easy to understand manner and options are clearly defined.
- You can encrypt messages created in gpg4usb with multiple keys. This means that you can have multiple recipients for a message, and you can even encrypt it with your own key. Nobody decrypting a message encrypted with multiple keys can see that it was meant for anyone other than them. This is good if you get scammed on the DNM since you can now have proof to back up any claims you have.
Part 1 – Installing the software
Since gpg4usb is a portable program, it’s not really installed per se. It’s a bunch of files that will be extracted from a .zip archive, and copied onto the USB drive. Head on over to the gpg4usb website and click on the green download button, and save the file.
Note: gpg4usb will not run on GNU/Linux distributions on USB drives formatted as FAT. If you’re only using it on GNU/Linux operating systems then ext4 would be best, otherwise fomat it to NTFS.
After the download has finished open up the .zip file with your archive manager of choice, you should be able to just double-click on it. You should see a folder named ‘gpg4win’, with all the files needed contained within that folder. Copy that folder over to your USB drive, open it, and it should look similar to the below picture.
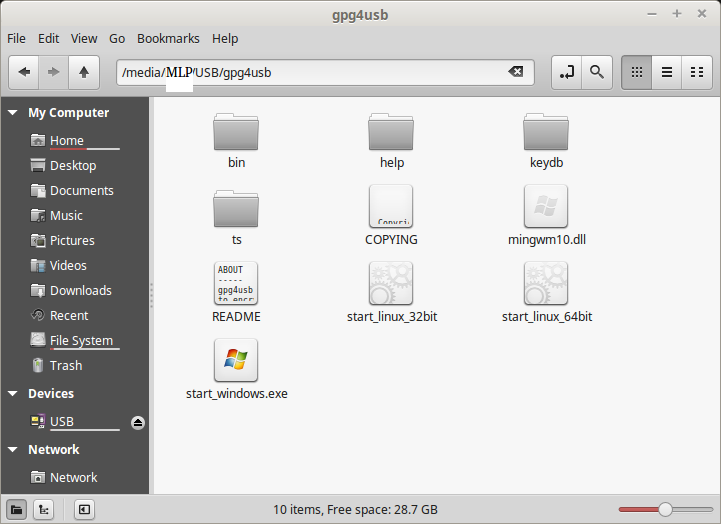
That was pretty simple right? Check out the README file if you want to know more about gpg4usb. To open it, all you have to do is double-click ‘start_windows.exe’ if you’re on Windows, or ‘start_linux_xxbit’ where ‘xx’ is your CPU architecture. For the majority of users this will be the 64bit version.
Part 2 – Generating your keypair
This is the very first thing you should do. Without your own keypair, it will be impossible to receive and decrypt messages. Open up gpg4usb and you’ll be greeted by the ‘First Start Wizard’. This will walk you through the steps of creating your keypair.
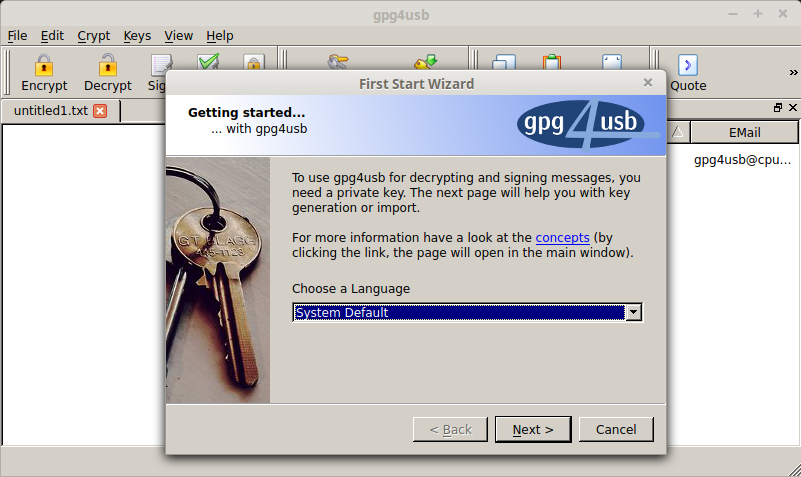
Choose your language then click ‘Next’. It will now ask you if you want to create a new keypair, import keys from GnuPG, or import settings/keys from an older version of gng4usb. Click on ‘create a new keypair’, then click the button that says ‘Create New Key’. You should see a window with the title ‘Generate Key’. Fill out the information, fill out a fake email if you don’t want to use one, select if you want it to expire or not, choose the KeySize, then create a strong password. A 2048 bit keypair will do fine until 2030, but it’s recommended to use a 4096 bit key. If you want to know more about how the keysize affects your security, check out the GnuPG website.
If filled out correctly your window should look something similar to below.

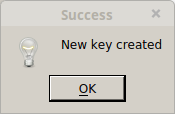
You can now click ‘Ok’, and your keypair will be generated. This may take some time depending on what you’re doing on your computer. Watch some porn, torrent some GNU/Linux ISOs, type up that essay you were supposed to have done last week. If all went well a window will pop up saying your keypair has been created.
You can now close out of the wizard, and select if you want to see the offline help or show the wizard again next time you start up. You’ll be brought to the main gpg4usb window and will see your keypair on the right, along with gpg4usb’s keypair.
Part 3 – Obtaining your public key
To receive messages you’ll need your public key posted somewhere. This is really easy in gpg4usb as you don’t need to save it to a file first.
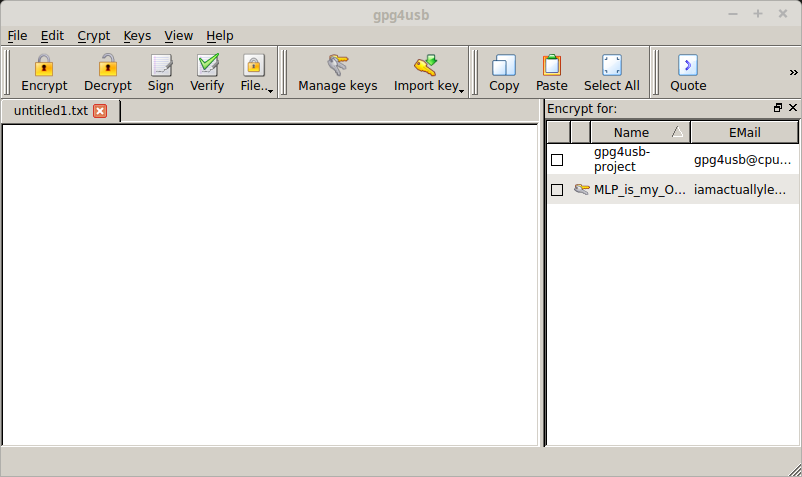
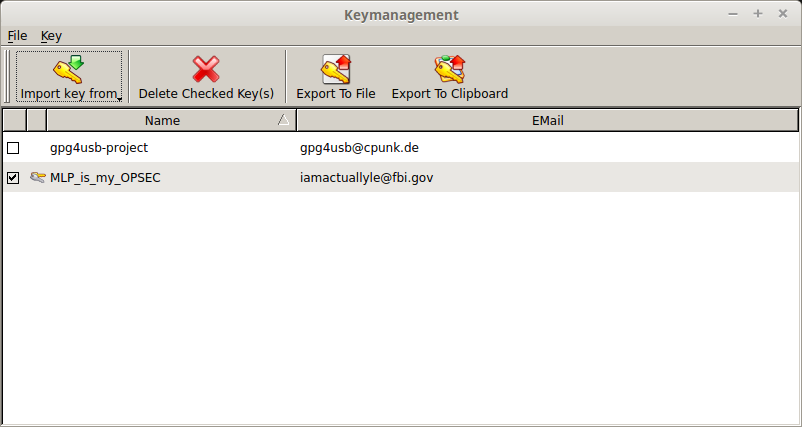
With gpg4usb open, click ‘Manage Keys’ at the top. A window titles ‘Keymanagement’ should appear. Check off the box beside your keypair name, and click ‘Export to Clipboard’ at the top. You can now paste your public key somewhere people can access it so they can send you messages. If you want a backup of your public key you can also click ‘Export To File’ and save it somewhere.
Part 4 – Obtaining your private key
It’s a good idea to back up your private key somewhere safe in case of computer failure. Although rare, things do happen and you don’t want to be stuck not being able to decrypt that very important message your mother sent you.
From the main window right click on your key on the right, and click ‘Show Key Details’.
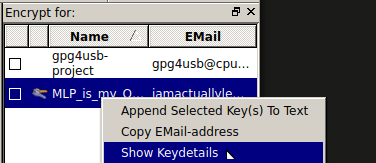
From here you can see the details of your key, it’s fingerprint, and export your private key. Click the button that says ‘Export Private Key’ and it will warn you that this is sensitive information that is not to be shared. Select somewhere to save it and keep the filename it gives. A good idea is to save it to a microSD card and hide it somewhere. You don’t want anyone other than you to get a hold of your private key.
Again, it is very important that you keep this file somewhere secure.
Part 5 – Importing a public key
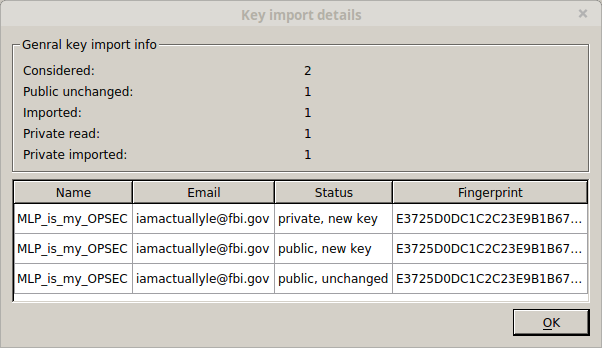
gpg4win makes this just as easy as exporting your public key. Highlight everything in the public key, including ‘—– BEGIN PGP PUBLIC KEY BLOCK—–‘ and ‘—– END PGP PUBLIC KEY BLOCK’, and copy it. In the main gpg4usb window click ‘Import Key’ at the top, then ‘Clipboard’. You’ll see a window pop up with the imported key’s details.

Close out of the window and you’ll see the public key has been imported.
Part 6 – Importing a private key
This is just as easy as importing a public key. In the main gpg4usb window click ‘Import Key’, then ‘File’. Browse to where you saved your private key and open it. You should see a window pop up confirming that it’s been imported. Click ‘Ok’ and you’ll see your keypair in the right part of gpg4win.
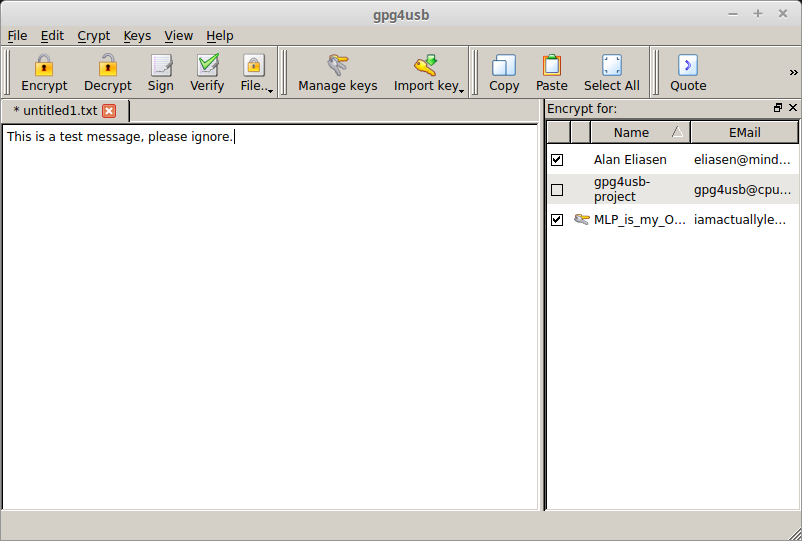
Part 7 – Encrypting a message
Encrypting a message in gpg4usb is super simple. In the main window for gpg4usb there will be a text box. Type in your message, click the checkbox for the recipient on the right, and click ‘Encrypt’ up at the top. Your encrypted message will now take the place of the unencrypted one. Copy and paste this and send it to the recipient.

Part 8 – Decrypting a message
Once again, gpg4usb makes this really easy. Just paste the message you received into the textbox and click ‘Decrypt’ up at the top. Enter your password and your decrypted message will take the place of the encrypted one.
Part 9 – Conclusion
If you’ve followed the above steps and understood each one you’re on your way to increased privacy in a world that wants to invade it. PGP can seem complicated at first, but once you learn it you’ll laugh at yourself for thinking it was so hard. Even if you still think it’s complicated or a waste of time, just keep in mind that taking an extra 60 seconds out of your day could possible save you from serving 5+ years in prison.


Does the process you outlined above automatically create a subkey? Or is that an additional step?
Hello
essentially, this user-friendly tutorial was heaven sent. Thank you so much because there is no way I could understand this fast this much. Have been sending to my friends and they all agree. One question, I see GPG4USB has not been updated for some time. Is this a matter of concern?
Dear Mr. Marsh,
You are essentially my hero. I am not a stupid person nor am I a genius. I have worked on this PGP thing and actually enjoyed it even through the frustration and misunderstanding. This tutorial really helped me finalize my understanding of it. I have been trying to figure this out for about, well, since the I market closed down and I lost 500 bucks.
Can you point me towards a how to verify the PGP public key tutorial please? I am looking and cannot find it. I am SO close to finishing this goal. Not that you will find this heartwarming, but I am disabled and my mind has been affected so learning all of this is quite an accomplishment. Anyway, any help would be appreciated.
Hi, Wondering if anyone can help.
Trying to get onto EM
Verify URL is correct no problem but invalid mirror signature.,
Getting my links off onion.live
Hi, thanks for this. Followed your instructions but after copy pasting EM’s PGP into my PGP window and verifying i get a message on yellow background with Text was completely signed by: Key not present with id 0x916026F56EAB831E.
Any ideas?
if you followed the tutorial correctly, imported the empire market key and you still get this error then it means this is a phishing link.
Same problem as Erebus and Olalekan matthew Lawal. Have downloaded it to USB stick, and also tried on laptop, running Linux Mint. Same problem every time.
What’s the alternative for this if I’m on an IPad?
There are lots of paid apps providing pgp services in the app store, iPGMail is one of them.
Hi, thanks for the very good tutorial.
Could you also recommend a PGP tool for OSX?
Best
For mac users we recommend “gpgtools”, a video tutorial by them can be watched here youtube.com/watch?v=P7xQVZN1S6Q ignore the part from 1.16 to 2.00.
Please teach us how to add our PGP keys to enable the 2fa because I followed all the steps, very simple but when I tried to add my PGP key to Empire I keep getting the following message;
‘Sorry! There was something wrong with your PGP key validation. Try to submit the form again.’
There is a new video tutorial coming this week that will explain how to add pgp keys to empire market. It’ll be available in the tutorials section.
I’ve tried downloading the software from gpg4usb.org but everytime I click on the file, it takes me to a ‘403 forbidden’ page… any solutions?
To John Mash.
Following your guide on enabling 2fa authentication, im stuck trying to decrypt empire market 2fa pgp confirmation massage.
Every time I’m trying to decrypt the massage in pgp software all I’m getting is the massage,
“windows. axe. has stopped working”.
Am I missing something here? Please help.
Strange…. Try to delete the pgp software and then reinstall it. Hopefully that will fix the problem.
Just followed all the steps, pretty basic but when I tried to add my PGP key to Empire I keep getting the following message
Sorry! There was something wrong with your PGP key validation. Try to submit the form again.
Not easy at all, it’s ridiculously complicated. Following the guide step for step i just cannot get it to work. Very frustrating
Its extremel simple with all the necessary screenshots but if you cant understand it then we will create a video tutorial very soon.
Thanks for your reply. It went well untill part 3.
”To receive messages you’ll need your public key posted somewhere” – where? on my pc? in a cloud?
Its on gpg4usb’s main screen. “click ‘Manage Keys’ at the top. A window titled ‘Keymanagement’ will appear. Check off the box beside your keypair name, and click ‘Export to Clipboard’ at the top”. Now open notepad or wordpad etc >> right click >> Paste >> save. Share this key with your friends who can use this to send you encrypted messages. You can also use pastebin to share your public key.
When I go to Generate Key after the installation wizard, I fill out all my info and select 4096 keysize, and select OK. It then straight away tells me Success – New key created. But nothing comes up on the list to the right. What am I doing wrong? I’m following the guide correctly.
same i tried 3 times i need a solution